Top 3 Best 19 inch Bowl Trimmers in 2022
While a product tended to by hand can add romanticism to an experience, that doesn’t necessarily mean it is a practical method. One useful tool that you can find as a grower will eliminate hours upon hours of hard work: the bud trimmer.
Instead of carefully cut by hand to get each individual bud, the bud trimmer does it for you, giving you more time to attend to other things during harvest. The market for bud trimmers isn’t small, and it can be a bit overwhelming to dive into, but that’s where we step in. In these reviews, we’ll go over our favorite bud trimmers and tell you why we like them so much.
What is the Difference Between Wet and Dry Bud Trimmers?
Once you begin looking at various auto bud trimmers, you’ll see that they are usually separated between wet and dry.
This is a crucial factor that you must know — and this knowledge will help you steer towards the perfect bud trimmer for your needs.
First off, wet trimmers trim fresh flowers. This means that you just cut down your plants crop and have not dried the flowers yet.
While still wet, plants flowers and their attached leaves have not curled yet, which allows them to be trimmed much easier.
This is why you’ll notice that automatic bud trimmers list higher bud trimmed per hour for wet bud trimmers.
When plants flowers are allowed to dry, its leaves curl inwards and become much more difficult to trim. It’s for this reason that you’ll notice that wet trimmers trim double the amount when compared to dry bud trimmers.
When it comes to dry bud trimmers, they require additional time to ensure that the delicate trichomes aren’t knocked off the flower.
Since the leaves of dried plants flowers turn inward during the drying phase, they will also require a much finer trim job that comes in very close contact with the flower.
This means that dry bud trimmers require much more precision when compared with wet bud trimmers. When compared with wet automatic bud trimmers, most dry flower trimmers don’t require a second pass.
Best Bowl Trimmers for Cannabis
- ECO Farm 19 Inch Electric Bowl Trimmer Leaf Bowl Trimmer
- DL Wholesale Twisted Trimmers 18" Clear Top Bowl Trimmer
- Happybuy 19 Inch Bowl Trimmer Leaf Bowl Trimmer
ECO Farm 19 Inch Electric Bowl Trimmer Leaf Bowl Trimmer
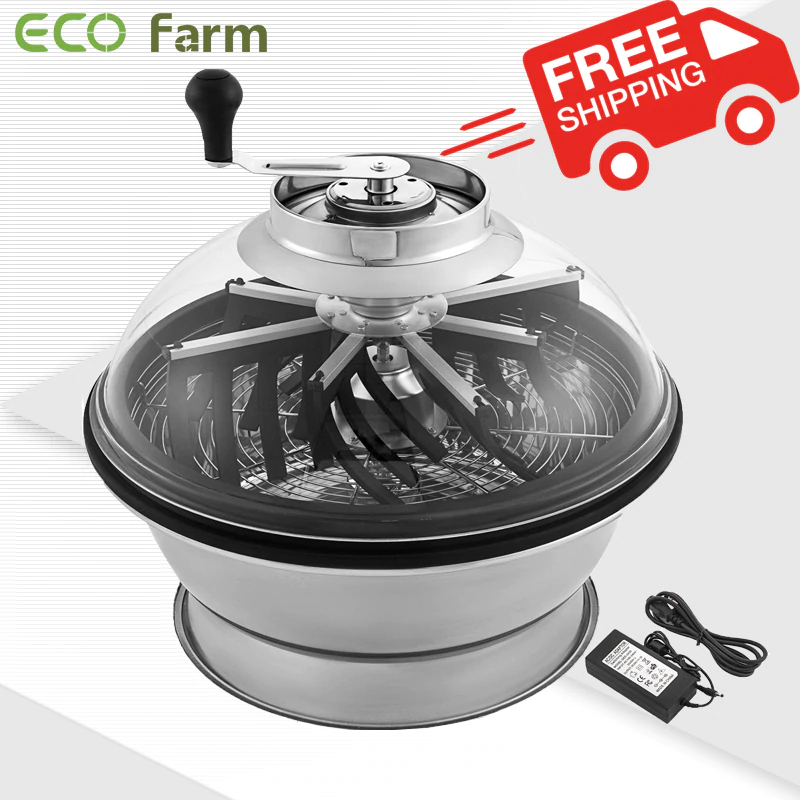
Features:
This ECO Farm Trimmer efficiently sweeps plants, increases pruning speed and reduces damage to plants during pruning. Interchangeable blades allow you to change to a more suitable blade when cutting wet and dry plants; the clear plastic cover provides a clear view of pruning. The non-slip mat prevents the mower from moving around during use, stabilizes the position, and increases cutting speed. The advanced metal wheel can increase the cutting speed of the blade and save time; the stainless steel bowl bottom, the device trims the fallen leaves, which can save the finishing time after use, and can trim the excess branches and leaves on various flowers and plants.
DL Wholesale Twisted Trimmers 18" Clear Top Bowl Trimmer
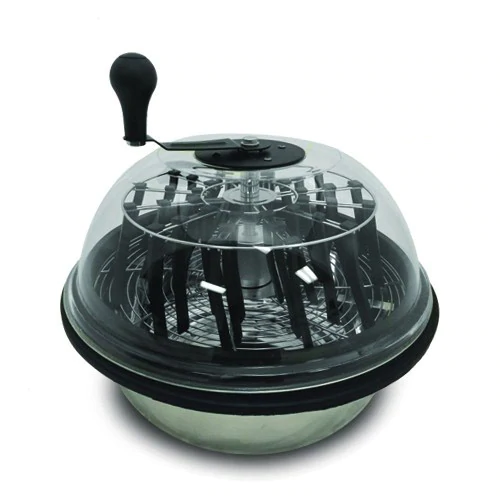
Features:
This 18" bowl trimmer utilizes the power of 30 scissors in one unit, includes (1) straight blades, and is made of high-quality stainless steel. Cut branches and leaves from many different plants and use them in projects like essential oils, aromatherapy products, and potpourri. Save time and effort and let the trimmer do the work for you! These trimmers will cut branches and remove leaves from many different plants for use in projects like essential oils, aromatherapy products, and potpourri.
Happybuy 19 Inch Bowl Trimmer Leaf Bowl Trimmer
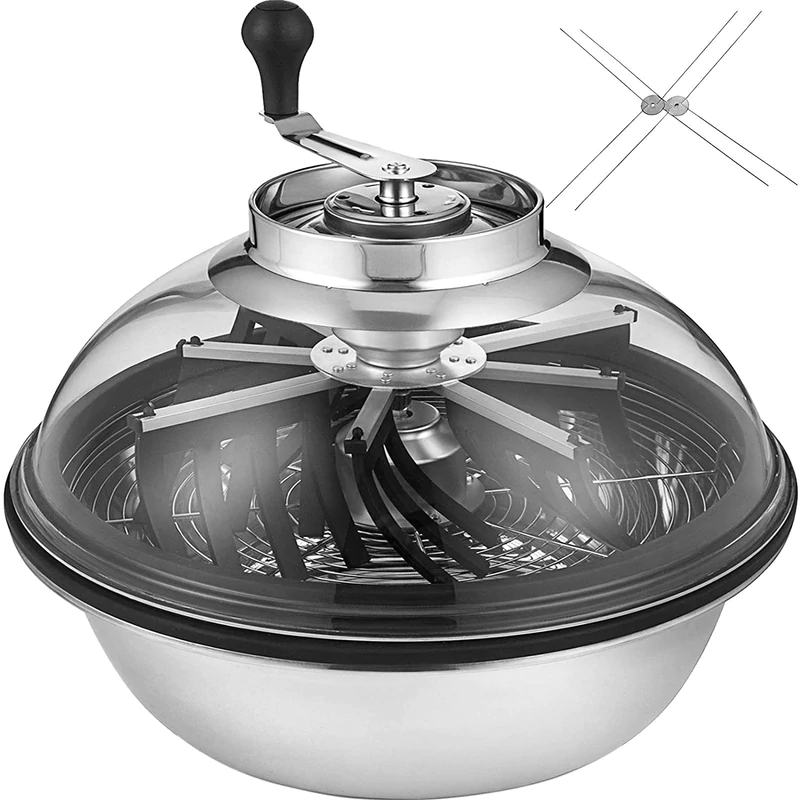
Features:
The main body of the bowl repairer is made of high-quality stainless steel, and all rubber parts are made of safe food-grade rubber. The bowl repairer uses a hand crank to rotate, which is easy to operate and saves time. The clear plastic top provides better visibility and you can easily and clearly see the inside of the bowl trimmer when operating. Removable handle for easy storage and removable grille for easy maintenance. Removable handle for easy storage and removable grille for easy maintenance. Provide you with convenient and easy-to-use manual pruning shears. Our Bowl Leaf Trimmer is used to remove protruding leaves and roots, which are essential for making hash, oils, aromatherapy products and potpourri.
How to Use Automatic Bud Trimmers
Automatic bud trimmers are as easy as they come. These straightforward machines are nearly plug-and-play and require only a few aspects from the user.
The majority of automatic bud trimmers utilize a hopper where you can place your raw plants flowers.
These are then funneled into the barrel, where they are trimmed and processed.The differences come from the added features to the trimming system.
Some automatic bud trimmers have collectors that efficiently gather your trimmed flowers.
Although bud collectors aren’t wholly necessary, they do make your trimming experience far easier.
Additionally, various auto bud trimmers come equipped with pollen extractors. These pollen extractors usually require you to change the tumbling system or the collection bag simply.
If you purchase a “smart” auto bud trimmer that contains a control system that allows you to configure the speed of the blades and tumbler, then you’ll be trimming in a snap.
If you choose an auto bud trimming system that incorporates a single preset speed, then you’ll be limited on your ability to fine-tune how your bud is trimmed.
Advantages of Auto Bud Trimmers
Simply put, automatic bud trimmers save you time — lots of it. These trimming machines were built to replace a roomful of trimmers while maintaining a high level of quality.
Although they do incur a significant investment, they will pay themselves off down the road.
What would normally take hours (or days), depending on the amount, automatic bud trimmers can significantly decrease your time on hand- trimming plants flowers.
Disadvantage of Auto Bud Trimmers
Although automatic bud trimmers have astounding advantages, there are disadvantages.
In particular, not all auto bud trimmers provide the same quality that humans are capable of.
Professional human bud trimmers can manicure flowers to the highest degree, which shows the kink in the armor of electric or motorized bud trimmers.
However, automatic bud trimmers are not far behind humans in terms of trim quality.
Due to this, this slight disadvantage may well be worth it for many that are fed up with hand-trimming pounds of plants at a time.
Conclusion
If you plan on buying a bud trimmer machine, make sure you research. A good-quality machine will last and make the trimming process that much easier. You’ll wonder how you ever lived without one!
ECO Farm ECOM 30W UV Supplemental Grow Light Bar VS Atreum Lighting UVA Light Bar, 30W (2-FT)
For some growers, it may seem counterintuitive that harmful radiation, such as UV grow light, can have a positive effect on plants.
But nature works in weird ways.
UV light can actually help you increase the yield and quality of your growth. So, adding a UV lamp to your lighting system can be very useful.
In this article, we’ll show you the best three UV grow lights for indoor plants.
Before we show you our list of the best UV grow lights, there are few things you should know about UV light and plants.
You can skip this section and scroll down to view our best UV grow lights recommendations.
Why Is UV Light Useful for Your Plants?
UV light is highly energetic, so it can cause damage to living tissues.
Around 3% of sunlight is UV light, so most plants are exposed to UV radiation in their natural habitats.
To shield themselves from the harmful effects of UV lights, plants will activate specific processes and produce certain molecules that have protective functions, such as repairing damage or absorbing UV light.
For indoor plant growers, these processes and molecules are useful in improving the quality and yield of plants.
UV light is a range of wavelengths stretching between 100 to 400 nm. This range is divided into smaller wavelength ranges (UVA, UVB, and UVC). In indoor gardening, UVA (315–400 nm) and UVB (280–315 nm) are mainly used.
There’s a lot of debate going on about whether UVA or UVB is better for plants.
UVA or UVB?
With a shorter wavelength, UVB light holds more energy than UVA light and some growers believe it’s more beneficial.
The effect of UVB light on plants has been well demonstrated in studies.
One study done on plants showed that treating the plant with UVB light resulted in around 30% increase in THC content.
Another study revealed that UVB can make plants more resistant to pests and diseases.
Above all, in some species and in small quantities, UVB light can boost photosynthetic activity.
That said, other studies show that UVA light has similar effects on plants.
For example, UVA light can boost the levels of nutrients and volatiles in different plant species.
Same as UVB light, UVA light can also boost photosynthesis and increase yield.
So, since UVA and UVB have similar benefits, why choose one instead of the other?
While UVB light can be slightly more beneficial, it can also have detrimental effects on plants and people.
That’s why today many UV-emitting grow lights put out UVA light instead of UVB light.
Mistakes done while using UVA light can be less dangerous than ones done using UVB. So, UVA light can be handled better by growers, especially starters, than UVB light.
It’s up to you to decide whether you want to use UVA or UVB light for your plants, but in all cases, you should know how to properly use the light.
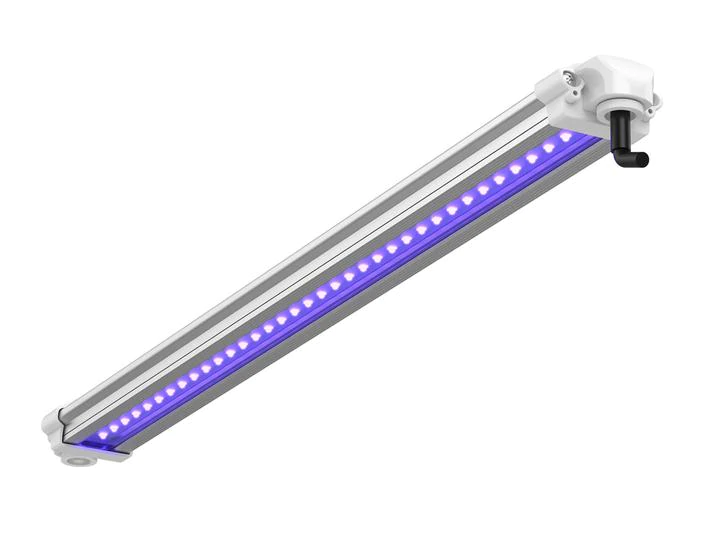
ECO Farm ECOM 30W UV Supplemental Grow Light Bar
Features:
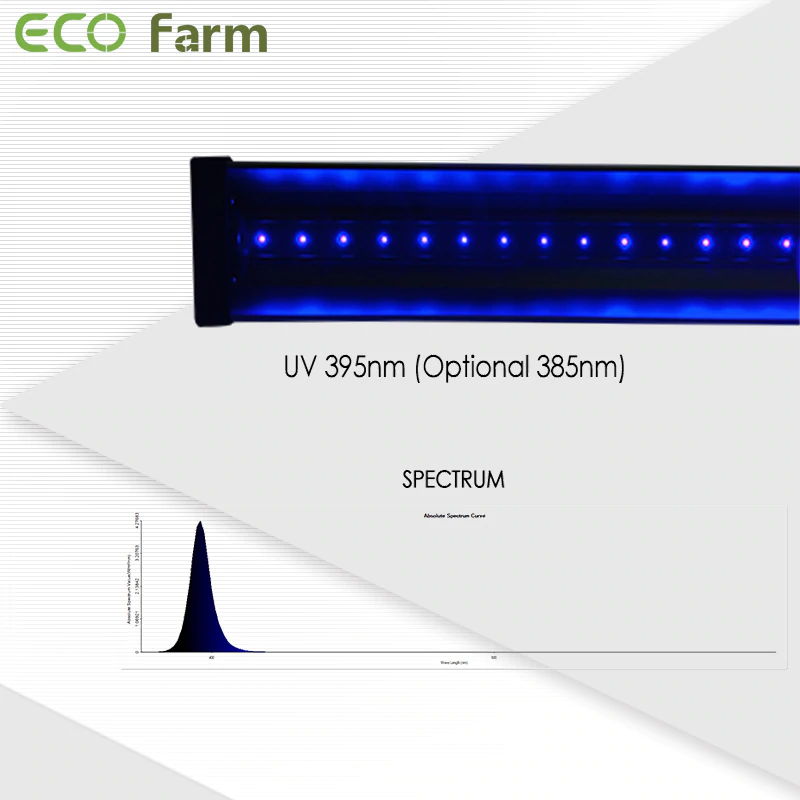
ECO Farm UV LED grow lights come with easy and quick bolt-on installation. With good heat dissipation and a sturdy body, it is a durable LED grow light designed for a 12-hour plant growth cycle. It covers the UV range between 385nm and 395nm. Ultraviolet rays promote the overall growth of plants, and are especially suitable for plant nursery and sterilization. It also increases the plant’s resistance to insects, bacteria and fungi. In safe doses, UV light helps produce oils that produce the wonderful smell and taste you’re looking for in your crops. This is what plants produce to protect themselves from more UV exposure. This grow light is suitable for hydroponics and indoor plants, mainly for microgreens and small plants.
Atreum Lighting UVA Light Bar, 30W (2-FT)
Features:
The Atreum UVA Light Bar (2ft) provides 30W of 385nm UVA supplementation in a compact and easy-to-use package. UV light is absent in many grow lights, but has been shown to trigger the plant’s defense mechanisms and produce additional desirable compounds. This spectrum is similar to the light used in the bed, which creates defense responses during photosynthesis. 385nm UVA is generally safe for human exposure. We recommend that you wear sunglasses for extended periods of time and never look directly at the diodes.
Ultraviolet Guide
Ultraviolet lights can be very effective when used properly. When used incorrectly they will damage or potentially even kill your plants. Let’s take a quick look at the different types of UV lights and how they should be used to help improve your plant quality.
Different Types of UV lights
It depends on which specific wavelength of UV’s are used and how they are applied to your plants.
There are three different categories to UV lights. UVA, UVB, UVC.
UVC Light is for Sterilization
UVC is 100–280nm. UVC is the shortest wavelength of the UV lights. It is extremely destructive. This is why UVC is used as a germicide to destroy microorganisms.
In nature, most UVC is absorbed by the ozone layer.
UVC can be used in a hydroponic setting by being applied inline to help sanitize the nutrient solution that will be feeding the plant. It can also be shined directly on top of the plants to kill pathogens (it can kill pathogens like powdery mildew).
UVC lights need to be used very careful. It can be destructive. When you are using it in-line, only the water would be exposed to the light so there will be no risk of damage to your plants (or to yourself). When it is used overhead to destroy pathogens, usually it is only on when you are not in the garden itself — this will minimize damage to yourself.
UVC lights can also help prevent or rid your system of algae when set in-line with your hydroponic system. Our recommendation above is for an inline system because of how effective it.
UVB Light is for Inducing Stress and Producing Flavor
UVB is 280–320nm. Most of the UVB is also absorbed by ozone layer.
UVB usually is the UV rays that cause sunburns. When applied to plants, it can cause a stress response in plants. This can result in the increase production of pigment, antioxidants, and resins. These are defensive responses that help to boost flavor. Visually, your plants’ leaves will be shinier and more vibrant.
How to Use UVB Lights
When you turn on your UVB light, it may not look like it is putting out a lot of light, but trust me, it is strong and enough for your plants. Plants are very sensitive to UV lights, so they do not need much.
UVB should be used at the end of a growth, preferably in the last week. UVB can actually slow down growth (because of the stress it puts on the plant). So you want to wait until your plants growth has peaked and use it in that final weak to help ripen the foliage that is already present.
When you are using your UVB light, test it in small doses — hours at a time. This is because different plants are affected by UVB differently. You can get drastic results with small doses.
UVA Lights Bring Out the Darker Pigments
UVA is 320–400nm, the longest wavelengths within the UV spectrum.
UVA causes the inhibition of cell elongation. This will help create shorter plants. It can also be used to further simulate the production of red and purple pigments in your plants’ leaves.
UVA can readily be found in many full spectrum lights including T5 fluorescents, metal halides, ceramic metal halides, and certain full spectrum LED lights. These usually have enough UVA to provide the benefit of shorter growths with more red and purple pigmentation.
Be Careful, Protect Your Eyes!
Please be aware that being around UV lights for too long can be dangerous (particularly UVC and UVB lights). Try to turn off the light before entering the grow room. If you must leave it on, try to stay far away from the lights to minimize the potential damage to your skin and also make sure to wear protective glasses.
Conclusion
So, what’s the verdict on the UV and Plants relation? It depends! For starters, there has yet to be scientific proof that UV-A adds more value than deep blue (400–450nm) light. If you are growing for terpene or hash production in a hydroponic environment, it may very well be worth experimenting with blue (430nm), UV-A or UV-B to see how it might enhance quality. If you are an organic/soil grower, the addition of UV, given the positive and negative trade offs, may not bring enough value to introduce it into your grow. UV-C should be used in air cleaning devices yet left out of most grow environments, as the impacts on plants and humans alike keeps this in a do-not-use category.
At the end of the day there’s no free lunch and no silver bullet. UV-A, B and C have their advantages and value adds, but they all come at a cost. Just like most things in life, the overall cultivation strategy you employ requires a holistic approach with a defined goal in mind to maximize the outcomes. UV won’t magically change anything and may just be the type of disruption you are trying to avoid. Remember, the devil is truly in the details, especially when it comes to the UV and Plants relation.
3 Best Carbon Filters of 2022
Indoor plants typically need more attention than outdoor plants. For example, indoor plants need more maintenance and supplements like fertilizers, pesticides, and manure. Each of these components has a distinguished odor. If all of these odors are mixed up with each other, there is a possibility that an unpleasant odor may linger inside and even outside your grow tent. So, what should we do to eliminate this unpleasant odor? Well, it is recommended to use the best carbon filter for your grow room.
Why Use A Carbon Filter At All?
Carbon filters filter the air in the grow tent, similar to how they filter the water in fish tanks, or how carbon filters can be attached to face masks to allow you to breathe in a cloud of hazardous gas.
Air comes in and gets forced through the special filter where impurities and odors are removed. It then gets forced out the other side as clean air that does not smell.
Carbon filters are a safe way to keep the air clean and odor free.
Most people use carbon filters not because they want pristine air in the grow tent, but because the smell of cannabis plants can be overpowering, especially during the flowering stage.
You may enjoy the smell for a little while, but trust me, after an hour you will be sick of it. More importantly, you don’t want anyone else to be able to smell it.
Features:
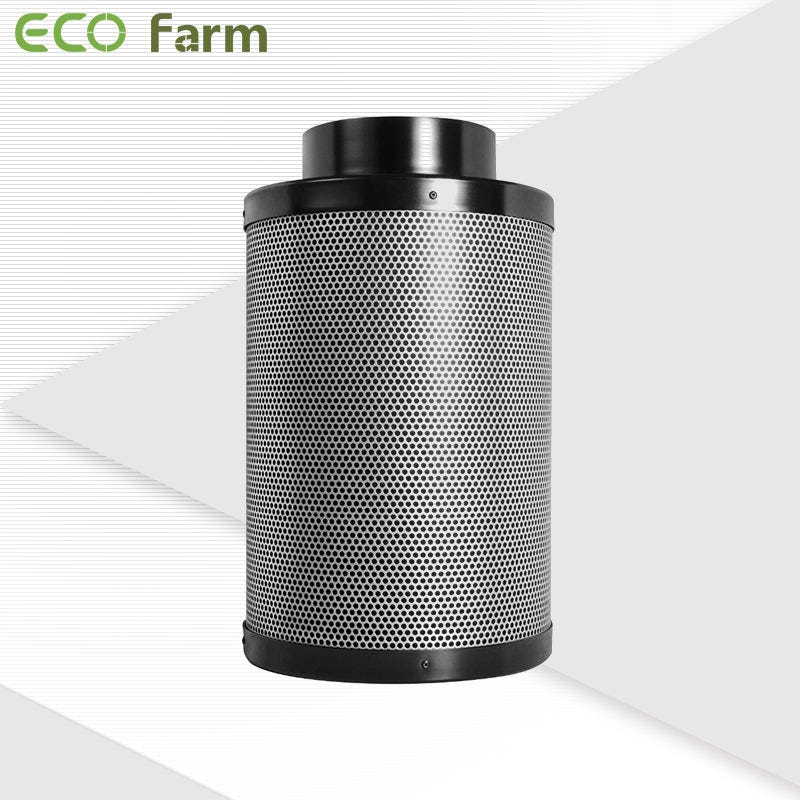
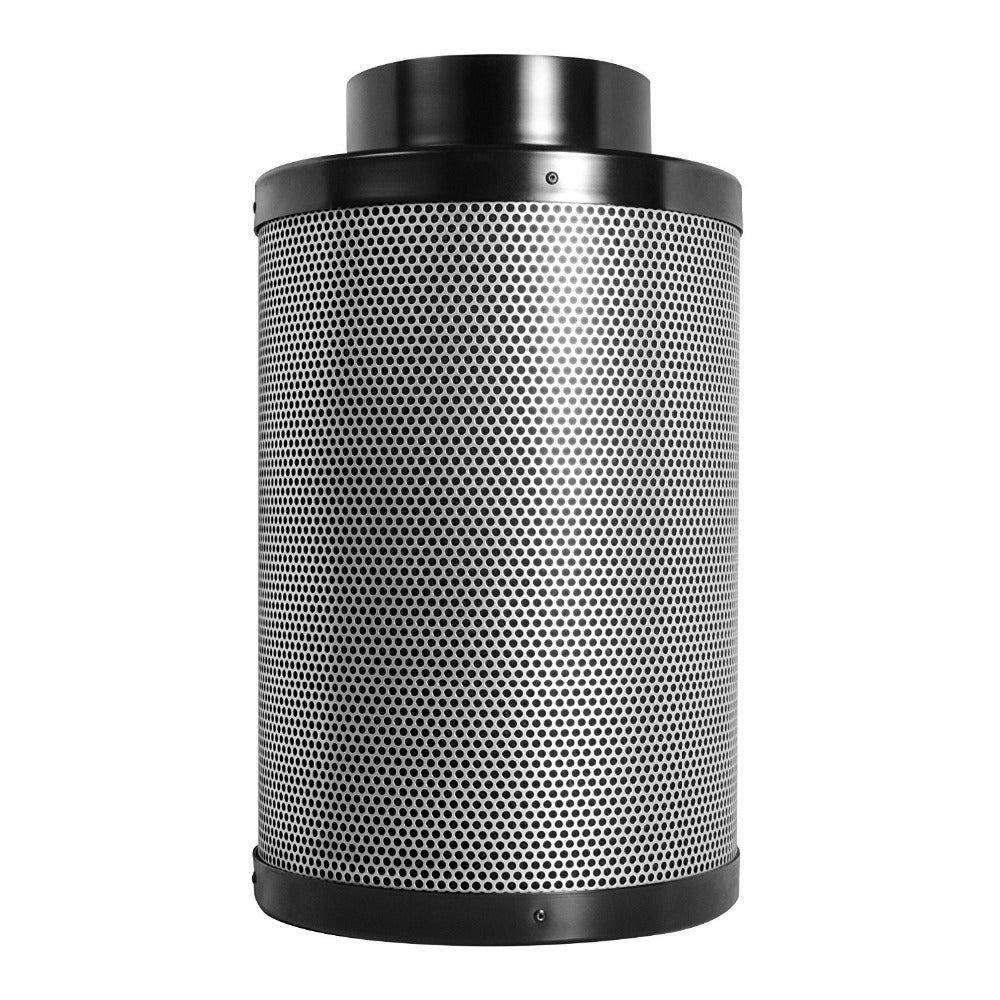
ECO Farm carbon filter is made of high-quality activated carbon, it provides 100% filtered airflow. Carbon capture is three times more than average air pollutants because of the optimized surface area of each carbon particle. Eliminate odour and chemical irritation: Prevent chemical irritation and eliminate odour-from stimulating indoor growth operations to basements and kitchens. Effective odour control: Eliminate some unwanted odours, pungent odours and particles in indoor planting tents and hydroponic growth rooms. Multi-functional application: The product can be used as an intake or exhaust filter in a variety of settings, including the use of 6-inch direct exhaust fans and duct fans, ventilation ducts and other accessories.
TerraBloom 4" Air Carbon Filter for Grow Tent
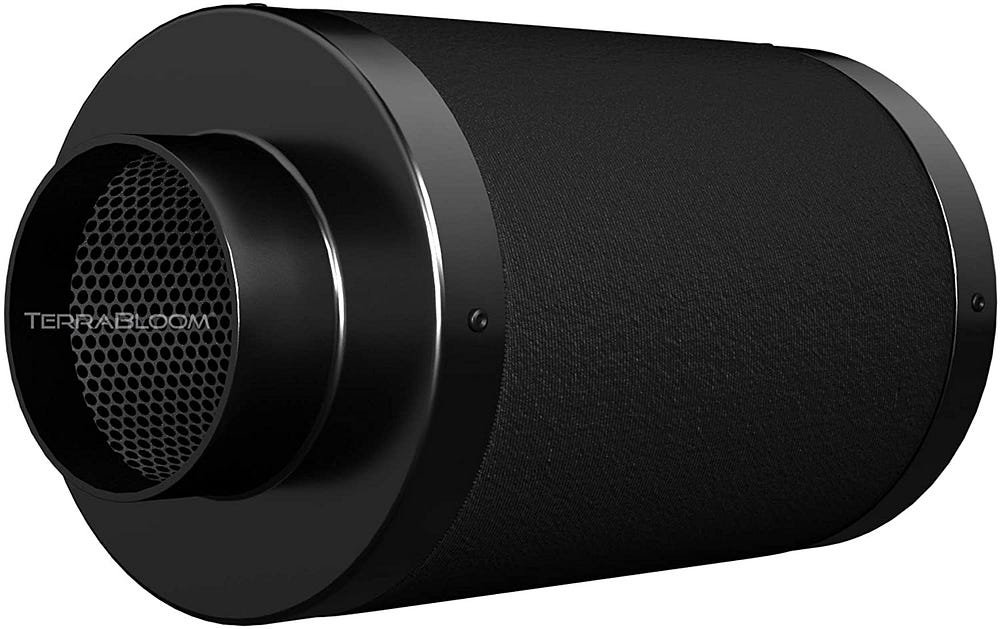
Features:
TerraBloom premium carbon filters have industry leading 1.8” (46mm) deep carbon bed that is at least 20% thicker than competition. Our filters scrub air better and have longer lifespan. It uses only highest grade, granular Australian activated charcoal, which gives you better adsorption and superior carbon porosity to capture odors, VOCs and other airborne pollutants in growing, laser engraving, food processing and manufacturing applications. This charcoal scrubber can be installed both inside and outside the grow tent and is capable of filtering air in both directions. Whether you want to use it as an exhaust or intake. You can pull air though the filter and out or push air into the filter and out of your grow room, it will work just as well.
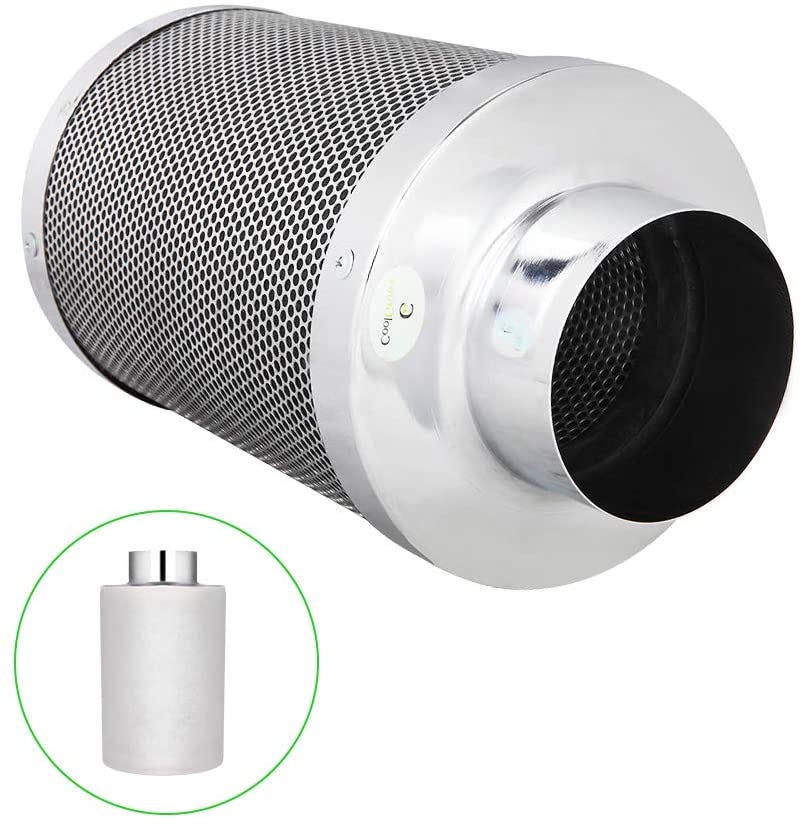
VIVOSUN Air Carbon Filter for Grow Tent
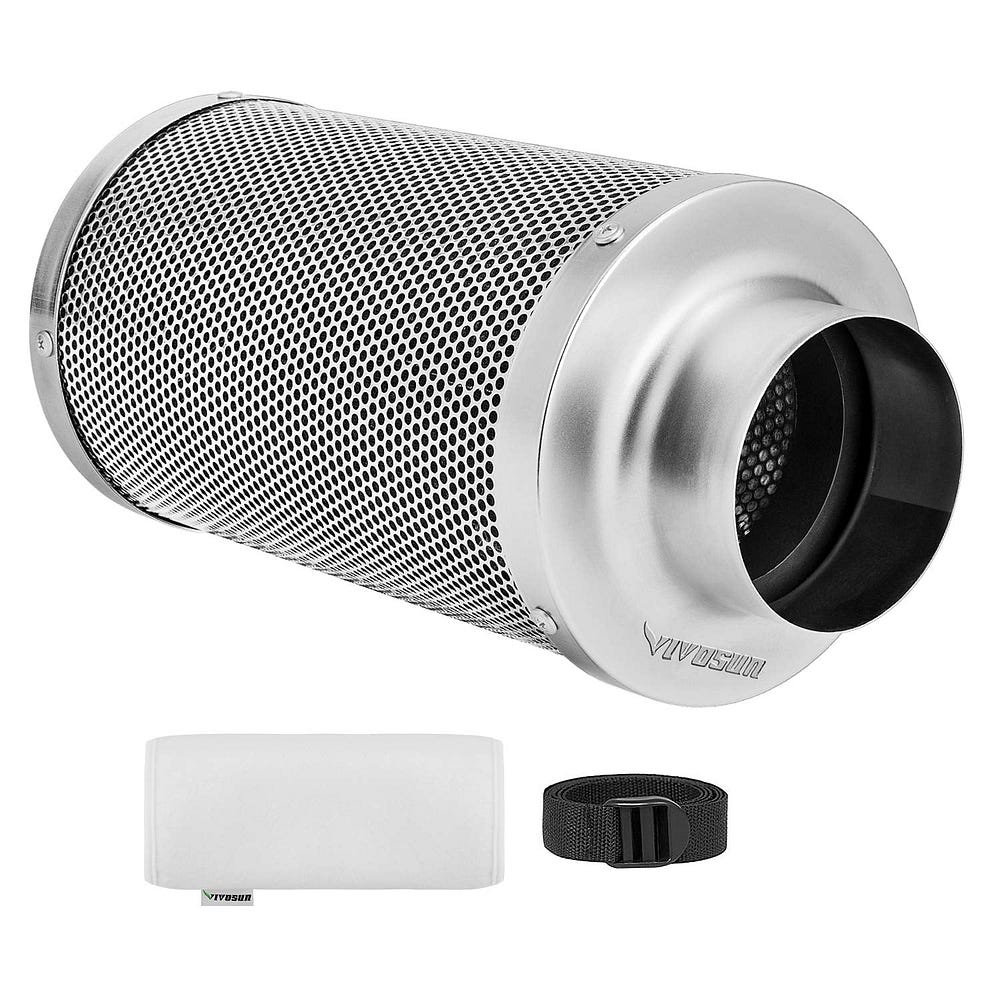
Features:
This carbon filter uses one of the best charcoals on the market, 1050+ RC Australian virgin charcoal. Additionally, the product has a mesh (inside and outside) that allows for more airflow (53% open area). This also features a reversible flange and base that extends life expectancy to 2 years. This carbon filter features a bed of 1050+ RC 48 Australian virgin charcoal that effectively removes most bad odors. This product has a machine filled carbon with 100% filtered airflow. Additionally, it can be used in two different ways — as an intake filter and as an exhaust filter. This also features internal and external grids that ensure 53% more open area and increased filtered air flow.
4 Qualities To Look For In a Carbon Filter
Basically, carbon filters utilize carbon in absorbing odor and bad smell. But how does it really work? Well, the filter absorbs air contaminants like unpleasant odor, pungent smell, allergens, and even pathogens. The carbon then reacts to these contaminants and traps them in the filter. Then, the filter screens out impurities and cleanses the air that goes through the filter before releasing it back into the air.
This process continues as long as the filter still contains carbon, as well as space for possible contaminants that can be detected in the air. Therefore, exactly because of this complex process, it’s not easy to look for the right carbon filter on the market. You have to consider the following factors in choosing your grow room filters.
1. Size
Carbon filters come in different sizes and lengths
Your chosen carbon filter should match all the components in your grow room so that it can work effectively. Some gardeners also consider that small grow tents can be used with small carbon filters like 3-inch carbon filters while large ones need large filters.
2. Thickness of the Carbon
Thick filter means the carbon filter contains more carbon
The thicker filter typically means more carbon. Thicker carbons have the capacity to perform more efficiently. However, take note that the thicker the carbon is, the higher the price can be.
3. Compact
Compact carbon filters perform better than ordinary ones
A compact carbon filter usually produces less noise and vibrations. Furthermore, compact carbon filters are capable of containing the absorbed odor and smell into the carbon granules as compared to the filters that have air pockets in between.
4. Highly Durable
Aluminum carbon filters are light and highly durable
Expensive but high-quality carbon filters are better than low-quality and cheap carbon filters. Remember that high-quality ones perform better and last longer. It is better to choose carbon filters that are made of aluminum since it is lighter and rust-resistant.
Tips and Tricks for Cleaning Your Carbon Filter
Cleaning your carbon filter is just very easy. Just follow these simple steps to successfully clean your carbon filter.
Remove the carbon from the grow tent.
Bring your removed carbon filter into an open area, preferably the outdoor part of your house as cleaning it might be a little bit messy.
Shake off any dirt found around the carbon filter.
Spray water onto the carbon filter using a garden hose to loosen the absorbed dirt.
Dilute 1 cup of dishwashing soap into a bucket of warm water and submerge your carbon filter. Let it stay for 15 minutes.
After 15 minutes, rinse the carbon filter and let it dry.
Conclusion
Last but not least, remember that before you set up a carbon filter, always consider the size of the components inside your grow tent. This is very important so that your chosen carbon filter would perfectly fit and work effectively in filtering contaminants. It is also necessary to consider the size of the filter. Small carbon filters are ideal for small grow tents while large ones are for large grow tents. Furthermore, quality should also be highly considered rather than the price.
ECO Farm DBL3000 Full Spectrum LED Grow Light 320W VS Mars Hydro FC 3000 LED Grow Light
With the lengthening daylight and the many seed catalogs arriving in your mailbox, it’s hard to ignore the promise of spring.
Are you planning to grow your own vegetable and flower transplants this year? You may find that shopping for grow lights for indoor gardening can be mind boggling.
When navigating the numerous options in lighting products, you may encounter confusing terminology. Don’t let this intimidate you. When choosing a grow light system for your indoor garden, you only need to understand a few basic principles.
Once seeds have germinated and the first “true leaves” emerge, light begins to play a vital role in the growth and health of seedlings. Outdoors, plants get energy from sunlight to produce their own food, a process known as photosynthesis.
Successful indoor gardening depends on grow lights that closely imitate sunlight to trigger photosynthesis without generating too much heat. Your seedlings will thrive under a quality, energy-efficient, full-spectrum light that’s evenly distributed over your growing area.
What are LED grow lights?
LED stands for light-emitting diode. An LED is basically a semiconductor that produces light when electrical current flows through it. The semiconductors, or diodes, restrict the flow of the electrons which makes them emit light. Plants can then use the light for photosynthesis. The process is very efficient and releases little heat.
LED technology allows growers to select different bulbs for different growth stages. I recently visited a vertical urban farm where the LED fixtures threw off red light and blue light to encourage the vegetable crops to flower and fruit. It was super interesting, but it also looked like a disco and that isn’t the type of light most gardeners want in their indoor living spaces. However, many LED grow lights are classified as full spectrum which means they closely resemble natural sunlight and emit white light that is pleasing to the eye.
How Do Plants Use Wavelengths?
The color of the light (or wavelengths of light) is exceptionally important for plants. There is still a surprising amount of debate about this, but plants use all of the wavelengths of visible light, including blue light, red light, green colors (although some growers will tell you differently), and more. There is even value to the non-visible light, such as the far-red and ultraviolet parts of the spectrum.
If we want to know the best light for plants, start by looking in the sky. The sun emits the entire spectrum of light. This is what we call full-spectrum light or direct sunlight. LEDs, specifically, can mimic this type of light, which is why we often credit them as having the proper spectrum of light for plants.
Most indoor plants flourish in full-spectrum bulbs (also called white light), which produce a balance of cool and warm light that simulates the sun. Seedlings, houseplants, culinary herbs, and a variety of other plants thrive with them.
The blue spectrum, in general, promotes the development of leaves, stems, and overall vegetative growth. Red wavelengths promote flower development, making it crucial for fruit-bearing plants. However, there is a wealth of information available on the unique advantages of red and blue lights. Some of it is also deceptive.
ECO Farm DBL3000 Full Spectrum LED Grow Light 320W
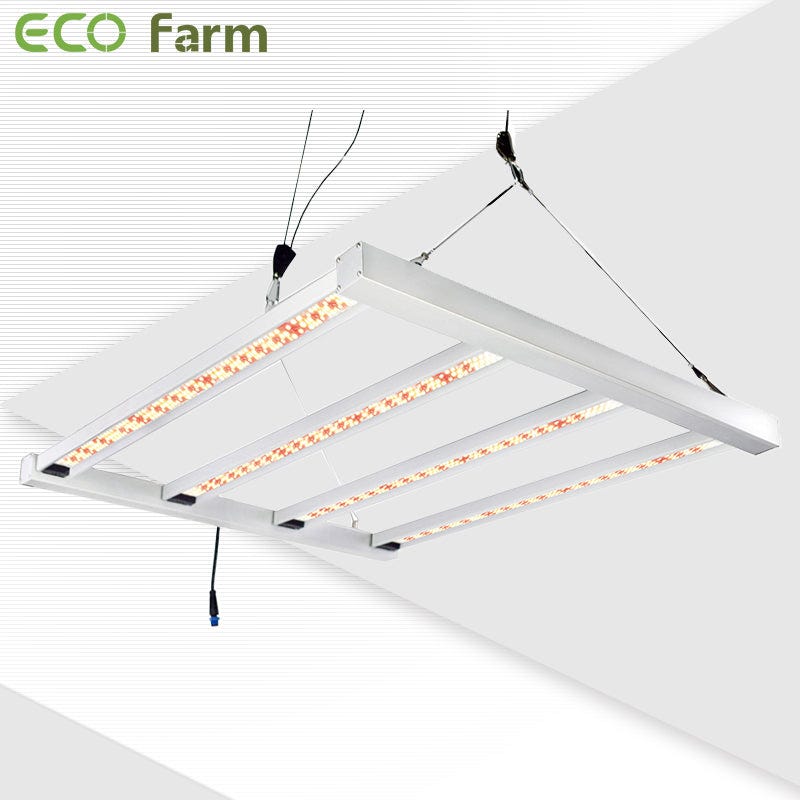
Features:
The ECO Farm LED Grow Light uses 864 Samsung LM281B diodes, has a market leading efficiency of 2.5 µmol/J, a maximum yield of 2.5g/watt, and an average PPFD increase of 30%, which is more cost-effective than other similar lights. Consuming only 320W, it perfectly covers the 3x3 growth space. The waterproof wide 4-LED light bar provides more even canopy coverage, and the strip light design and aluminum on the back contribute to better airflow and good heat dissipation. This LED grow light is very suitable for commercial LED grow light, DBL3000 dimmable grow light with daisy chain, can connect up to 15 lights, the master light provides great convenience for your planting! With Enhanced High Intensity Spectrum (480pcs 3000K Warm White LED, 188pcs 5000K White LED, 192pcs 660nm Deep Red LED) Ideal for Vegetable Blossom, Light for Density Buds, Widely Applicable for Full Cycle Commercial, Home, Grow Tent, grow room, hydroponics, soil growing.
Mars Hydro FC 3000 LED Grow Light LM301B Osram Diodes
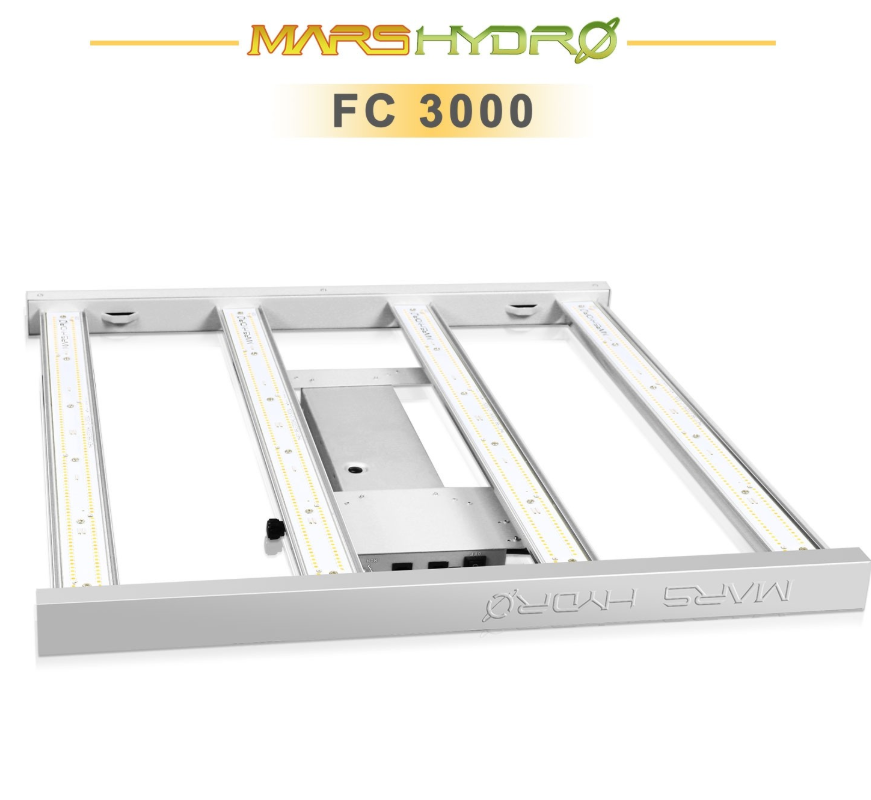
Features:
The Mars Hydro LED Grow Light was designed with commercial growers in mind, but is a perfect fixture for indoor gardens or grows of any size. The FC 3000 utilizes 896 leds with Samsung Lm301b and Osram 660nm for high output and excellent heat control. This efficiency translates to lower costs for the end-user. The Mars Hydro FC 3000 LED grow light is designed to concentrate the lighting on each bar, increasing light penetration into the canopy so plants have the opportunity to absorb more light. The FC 3000’s design and high-quality components make it a durable full spectrum led grow light with an incredible lifespan. Setup is a breeze with its independent, removable power supply. The aluminum heatsink allows for better heat dissipation and eliminates noisy cooling fans so your grow area remains quiet and cool.
How close should grow lights be to houseplants?
Hanging grow lights is the best way to mimic the sun because it delivers light from above. If you place grow lights at an angle, it might not distribute the light evenly. The light should always reach the entire plant, otherwise, they will grow slanted in the direction of the light source.
Incandescent grow lights should always be at least two feet away from your plants because they give off a lot of heat and could damage the foliage. Fluorescents should be at least one foot away from your plants, so as your plant grows be sure to adjust the height of the grow light.
LED lights give off almost no heat at all, so it’s safe for houseplants to grow within 6 inches of them. That makes LED lights perfect for tight spaces like shelving or greenhouse cabinets. I personally use all LED lights to take the guesswork out.
How long should I leave grow lights on?
In addition to proximity to the plant, the time you leave the grow lights on and the strength are critical parts of the equation. When plants are exposed to light, they’re hard at work photosynthesizing. So if you overexpose your houseplants, they will “burn out” — sometimes literally — and it could damage their foliage, prevent flowering, and dry them out.
Generally, plants need at least 8 hours of darkness every day, sometimes more. Darkness is an important part of a plant’s growth because that’s when it uses the energy it has stored up to grow and flower.
Most houseplants will do great with 8 to 10 hours of sunlight per day, though flowering plants might need more. Above all, plants like consistency. Keep a timer on your grow lights to give your plants a light cycle that will help them grow and stay healthy.
Conclusion
No doubt, LED grow lights have come a long way, and now there are significant benefits to using the types of grow lights in a commercial or personal indoor grow room or cultivation. Happy growing!
Triminator Dry Automatic Trimming Machine VS TrimPal Dry Trimming Machine
However, it's not enough to simply own a decent pair of trimming scissors; maybe you need a bud trimmer machine. With that in mind, this guide will cover the benefits of using the bud trimmer and considerations of choosing the best bud trimmer.
Best Rosin presses 2022 Updated
There are a few things to consider to help you determine the best rosin press for your needs. Rosin presses under $1500 will have very powerful jacks, larger heat plates, and can usually process a lot of material.
VIVOSUN VS4000 LED Grow Light VS Viparspectra Pro Series P4000
Best Carbon Filters for Your Grow Tents (2022 Updated)
Grow rooms require a different kind of ventilation from normal rooms. They are more prone to carbon emissions because of the life processes and biological ecosystem that is been going on, continuously 24 hours a day. And these carbon emissions comes with a huge risk to human life and workers that help in maintaining the grow room. And also getting a smell like a hotbox is something that is pretty hard to bear all the time.
Aside from the drawbacks grow rooms are a wonderful option for farming many crops. Many grow room farmers in the USA and some other part of the world keeps their plants to grow room because of their high yield in that environment and fast blossoming. Grow room plants gardeners come with many challenges but one of the major issues is the strong smell of it especially when it is blossoming to maturity. That makes the role of carbon filters worth considering. Besides the plants alone the smell of pesticides fertilizers and nutrients make the odour more intense and the result is an intoxicating smell.
So now what is a carbon filter? carbon filter consists of a bed of activated charcoal that works on the principle of adsorption, the charcoal adsorbs the impurities leaving behind the purified filtered air devoid of any hydrocarbon, biogas or sulphides. They come in the market with different varieties and specifications and choosing the best is a bit of Maths for gardeners. That’s why we are here to help you out.
Below are some of the best carbon filters which are handpicked from Grow rooms by looking at their efficiency in the most intoxicated environments.
How Does a Carbon Filter Work?
Carbon filters contain odors and decontaminate the air through a process called adsorption. The process of adsorption takes place when molecules latch onto the outside of a surface, as opposed to absorption when they’re soaked into it.
As I mentioned, carbon filters use activated carbon, whereby the more porous the carbon, the better the extraction. The filters inside are formed by chemically and thermally treating charcoals, and turning them into activated carbon.
Activated carbon contains millions of pores, which help extend the surface area to 2000–4000 m2 per gram. Smelly particles and volatile organic compounds (VOCs) are drawn onto its surface to ensure better odor management.
A highly porous carbon increases the amount of surface available for impurities to attach to when contaminated air passes through the filter.
Activated carbon comes in the form of thin or thick packets for filtering the air. You’ll need to insert it into the main purifying unit, such as a HEPA air filter (most recommended) or an air purifier.
As contaminated air passes through the main filtration unit, the activated carbon inside the unit absorbs the impurities. The air exiting the unit comes out of the filter purified and clean.
It’s best to use the activated carbon in conjunction with a HEPA filter. That way, you can easily restrain larger particles like lint, pollen and dust from coming into contact with it. The HEPA filter provides better performance and lasts longer.
Reason to Use a Carbon Filter in Grow Tent?
There are several benefits associated with using a filter in grow tent or grow room. If you’re a plants grower, you probably know that keeping the plants aroma under wraps is no mean feat.
Worse still, perhaps you aren’t willing to let your neighbours know about your indoor plants growing “hobby”. And that’s where a Odor Control Scrubber comes into the equation.
A carbon filter works like a magic bullet when it comes to trapping the smelly particles from the air, thus promoting your privacy. It also takes the impurities out of the air so your plants can enjoy the clean, fresh air they need to thrive in your grow tent.
See, your plants not only need the right temperature to thrive. They also need the humidity, nutrients, and fresh air in correct proportions. A carbon filter eliminates such impurities as air-borne pathogens, which can cause diseases to your plants and ruin your grow yield.
By using activated carbon, you’ll improve your ventilation system, enabling your plants to breathe freely and eventually blossom. Other than that, these are the least expensive of all air filtration systems available.
Investing in a high-quality Air Filter is a sure-fire way to keep your electricity bill down. What’s more, these are pretty quick and easy to set up.
Features:
The ECO Farm carbon filter will soak up and eliminate some of the most undesirable odors and additional harmful and potentially ill-fating chemicals in the air. This carbon filter is made of high quality activated charcoal, delivering 100% filtered airflow. ECO Farm air carbon filter provides higher absorption and a longer life rating. Especially, it is designed in black-coloured style, the panel ventilation rate goes up to 53%, greatly reducing air volume loss and increasing efficiency. It can be used as an intake or exhaust filter, ideal for grow tents and hydroponics rooms, indoor planting tents, basements and kitchens.
CoolGrows 4 inch Air Carbon Filter
Features:
This carbon filter will soak up and eliminate the undesirable and ill-smelling odors of grow rooms to keep your place clean while bringing you cleaner air. The flange and bottom can be removed to reverse the charcoal canister, making the filter body could be flipped upside-down for reversible smell filtration and also extending the service life. Machine packed carbon enables 99.8% filtered airflow. Inner and outer mesh provides 53% open area allowing increased airflow, easy compact with the Inline Fan.
TerraBloom 4" Air Carbon Filter for Grow Tent

Features:
TerraBloom premium carbon filters have an industry-leading 1.8” (46mm) deep carbon bed that is at least 20% thicker than the competition. This carbon filter uses the only highest grade, granular Australian activated charcoal, which gives you better adsorption and superior carbon porosity to capture odors, VOCs and other airborne pollutants in growing, laser engraving, food processing and manufacturing applications. This charcoal scrubber can be installed both inside and outside the grow tent and is capable of filtering the air in both directions. Whether you want to use it as an exhaust or intake. You can pull air through the filter and out or push air into the filter and out of your grow room, it will work just as well.
What to Look for In a Carbon Filter
It’s not easy to choose the right carbon filter considering the abundance of options on the market.
However, when you put the following into consideration, your chances of choosing the right one is significantly upped:
Pre-filter. Many carbon filters now come packaged with pre-filters that you put outside of your carbon filter. These pre-filters helps in reducing particles like dust from getting into the carbon filter. Not only will this improve the lifespan of the carbon filter itself, but also the inline fan or other equipment you use with your carbon filter.
Carbon Thickness. When the carbon is thicker, the absorption will be greater, which makes the carbon filter more effective in controlling odor. Because thicker carbon filters are more efficient, you should expect a higher price tag for them.
Portability. With compact carbon filters, you get lesser noise and vibration during operation. These kinds of carbon filters are better at absorbing odor and smell and transporting them into the carbon granules. Unlike those with air pockets in between, this type can catch odor more effectively.
Durability. While it might be tempting to go for inexpensive models, it’s better to buy expensive, higher quality carbon filters than for you to choose lower quality ones that may not last long. Sturdy carbon filters have better performance and generally last longer, and their maintenance is lighter compared to their counterparts.
Conclusion
Your best carbon filter for grow rooms needs a filter to stop odor from escaping and also to keep bugs out of the system. A carbon filter is the best choice since it’s reliable and relatively quiet. They are only as effective for indoor growing as the carbon in them, so when choosing a filter, go for the best carbon filter for grow room, one that has high-quality activated charcoal and has plenty of it. Thicker carbon filter beds mean a longer lifespan and more effective odor control and filtration.
Best Inline fans For Your Indoor Grow Tents in 2022
Grow tents are now popular for indoor growing today. However, I realized that getting the best results with a grow tent depends on using the appropriate accessories. One of such accessories is an inline fan.
So, I researched the best inline fans for grow tents and found some amazing options. In this article, I’ll share them with you, alongside some other information that you might need.
What Should You Look For In A Quiet Inline Fan?
When finding the quietest inline fan, you may get confused. There are hundreds of options out there with thousands of reviews, be it good or bad. While buying an inline fan, you must keep in mind to check how much power it is providing.
Good airflow with a variable speed control system is essential for your plants to sustain both winters and summers. An inline fan will lessen your burden. Find a fan that perfectly fits in your grow tent, as placement of the tent is essential. Obviously, you would want your fan to be reliable and durable. So, look for a more extended warranty period.
At last, quietness matters the most. Since plants take a long time to grow, you would desire the inline fan with the least noise level. I’ve finalized a few top picks for the quietest inline fans for you.
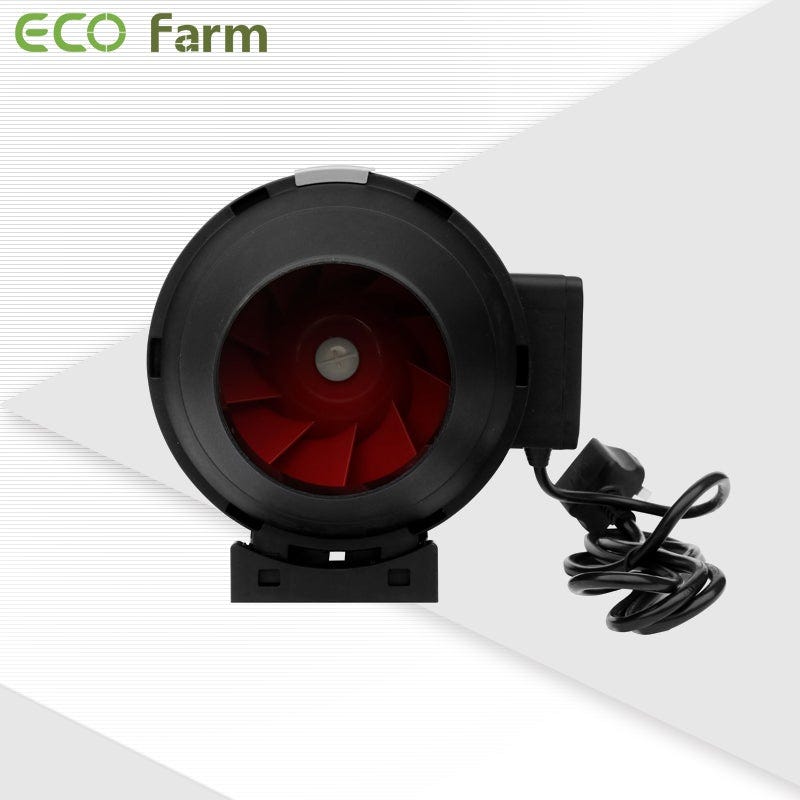
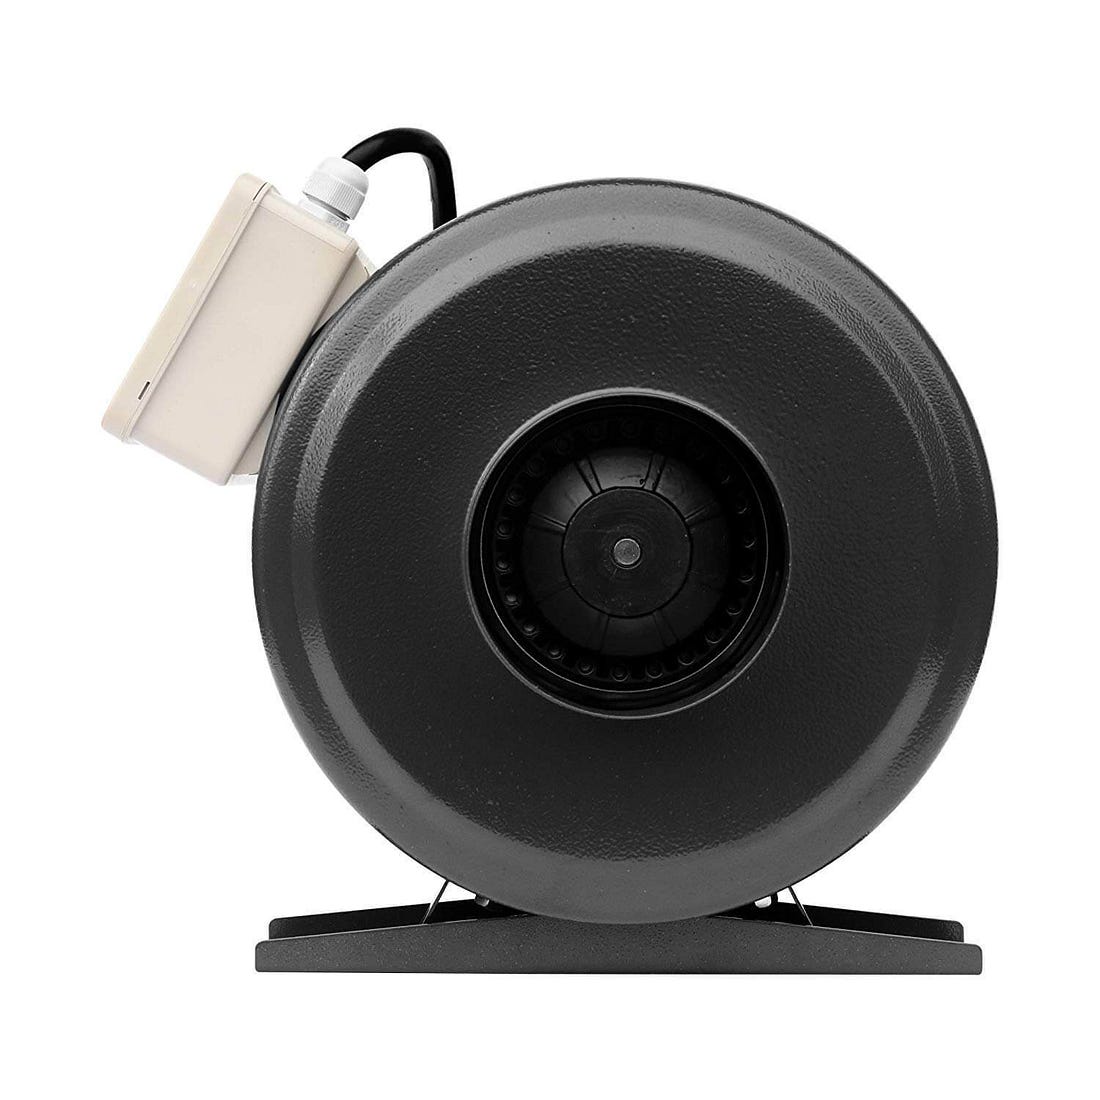
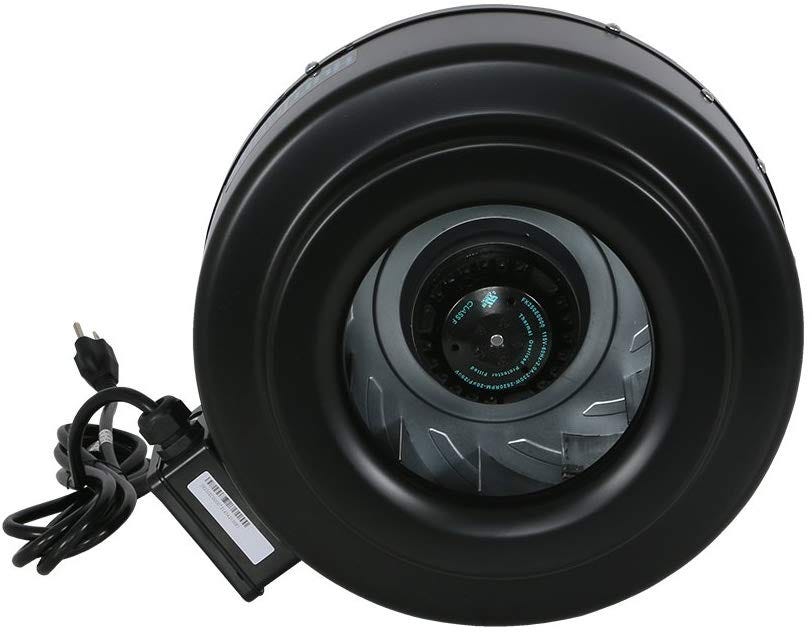
ECO Farm 8 Inch In-line Fan Exhaust and Intake Fan for Grow Room
Features:
For the combination of power and quiet, ECO Farm inline fan is the perfect choice. Even at the highest power setting, it is very quiet. Due to the use of a pulse width modulation (PWM) controlled DC motor, its quiet noise level is only 37dBA. This motor uses less power than standard AC motors. In addition to a quiet motor, this fan also has an adjustable speed setting. The airflow is 390 CFM, which is very suitable for medium-sized planting rooms. In order to install the fan, the machine and wood mounting screws are included to assist in the installation.
SunStream Inline Duct Fan Vent Blower
Features:
The construction of this fan is quite sturdy and durable. This fan is easy to mount and install because of its high-quality manufacturing. It is designed with the durable ceramic-coated and permanently lubricated bearing that requires Zero maintenance. It gives you a higher output than any other fan. For the price point, it is quieter and more powerful than the others. What else do you need? The speed controller is added to maintain the speed of the fan inside the tent. This inline fan will be worthy of your investment. It is suitable for industrial, household and horticulture ventilation applications for air clean and temperature control.
HURRICANE Inline Duct Fan for Grow Room
Features:
The Hurricane Inline fan is undoubtedly the best inline fan for large grow tents and rooms. For an inline fan that has a CFM rating of about 1060, it’s definitely more than enough for most of the large-sized grow tents on the market. Its build quality is appreciable, no doubt, as it is made with a combination of high-quality materials. The fan is made from steel and dons a finish that looks like a powder-coated finish. This fan is available in different sizes ranging from 4-inches all the way to 12-inches. Similarly, the CFM rating of the respective fans increases from 171 all the way to 1060. This Hurricane inline fan lacks controls of its own — you can’t control the speed and the climate.
Considerations For buying an Inline Fan
While the factors are more concerned with the fan’s general use, now we will tell you the specific features to consider in your inline fan before getting it. Trust us; this will ensure that you can choose the best option. So, here they are.
CFM of Your Fan
This is perhaps the most important thing to consider when getting yourself an inline fan. The CFM refers to the cubic Feet per Minute that your fan can handle. This is important because it plays a vital role in the overall efficiency of your fan.
CFM concerns the air that your fan can exchange out of an area within a minute. Usually, the grow tent is usually measured by cubic feet. So, this measurement involves your fan’s capacity to exchange air within that grow room within a minute.
Usually, this is calculated by getting the cubic feet of space of the grow room. For instance, where the room has a specification of 8’ x 4’ x 12’, that’s a room measuring 384 cubic feet. You might then be thinking that all you need is a fan with a specification of 384 CFM.
However, that is not the case. To get the appropriate CFM specification, you’ll need to multiply the cubic feet of space by a minimum value of 1.33. This ensures that you can account for the drop in airflow thanks to filters in the ventilation system.
So, if you are still wondering how to calculate the required CFM, we just told you all you need to know. Multiply the cubic feet value of the room by a minimum value of 1.33. Then, you can go on to get yourself a fan that matches that value.
For instance, in the example above, 384 x 1.33 will equal ~510. In turn, when getting an inline fan, you will need one with a CFM of 510 to get the best result in your grow tent.
However, it would be best to keep in mind that other factors will determine the CFM rating you need for your room. This is because they directly affect the airflow within the room. Now, here are those things.
1. The Grow Lights
The grow light in use plays a significant part in what your ventilation needs will look like. For instance, HID lights produce more heat than other options like CFLs and LEDs. Precisely, your room will tend to be hotter if you’re using HID lights. In turn, you will need more ventilation compared to if you had been using LED light.
So, is your grow room fitted with HID lights? Then, it would be best if you made an allowance to get the right CFM requirement. In turn, boost your calculation by 5% for each light within your grow tent. Also, where your HID light isn’t air-cooled, you will need to boost your calculation by around 10 to 20%.
2. CO2 or Carbon Filters
Another thing that affects your airflow and impacts your CFM calculation is the use of filters. This is because they reduce the intake of air. In turn, you will need to boost the calculation by a minimum of 20% to get the appropriate CFM for your grow tent.
3. Room’s Average Temperature
As you saw under the grow light discussion, the temperature of a room affects a room’s ventilation needs. The higher the temperature, the more ventilation the room will need. So, in cases where you are in an area with an increased average temperature, you will need to boost the CFM calculation.
In turn, boost the calculation by a minimum of 25% where the temperature is higher. However, where there’s a combination of high humidity and high temperature, you will need to boost the calculation by around 40%. This way, your inline fan can function appropriately.
Diameter of Your Inline Fan
Inline duct fans come with a specific diameter. While you might be wondering what’s your concern with this, remember we are talking about air. So, you need to assess the diameter of whatever option you’ll be getting.
First, you must understand that with a wider diameter. The relative humidity of your grow room decreases faster in comparison to the smaller ones. As such, you usually want to go for an option with a smaller diameter.
However, that’s not all you need to do as things get complicated. This is because fans with smaller diameter come with lower CFM. As you have seen above, a low CFM rating won’t do the trick for your grow room in some cases.
So, here’s what you want to do. You want to consider the CFM requirement of your grow tent. We already discussed how to calculate it above. So, get right to it.
Once you do this, get an inline fan that meets your CFM requirement and choose the one with the smallest diameter. This way, you get the best of both worlds.
Length of the Ducting
Another feature that you want to consider is the length of your fan’s ducting. You should know that this feature is an important consideration as it influences the power of the fans.
Precisely, the ducting’s length directly affects the exhaust power of your inline fan. So, you want to go for a long ducting. This way, you enjoy a more effective option.
Also, keep in mind that turns and twist in the ventilation setup also affect your grow room’s required CFM. Precisely, it increases the needed CFM. So, be sure to consider this when getting an inline fan.
Conclusion
As you can see, inline fans along with carbon filters and dehumidifiers play an integral role in maintaining the ideal environment in your grow room.
Buying the quietest inline fan will allow you peace of mind while ensuring that your plants stay happy with fresh, cool air.
If it weren’t for the inline fan, you’d spend a fortune on air conditioning costs, thus rendering plants growing completely inefficient.
The inline fan’s job is a difficult one. It pulls air from one source and pushes it out to another. In between, it needs to efficiently push air through the carbon filter, ducting, and lighting.
This is why you can’t overlook your inline fan choices. Inline fans can make or break your plants crop, so it’s critical that you understand your grow room set-up.
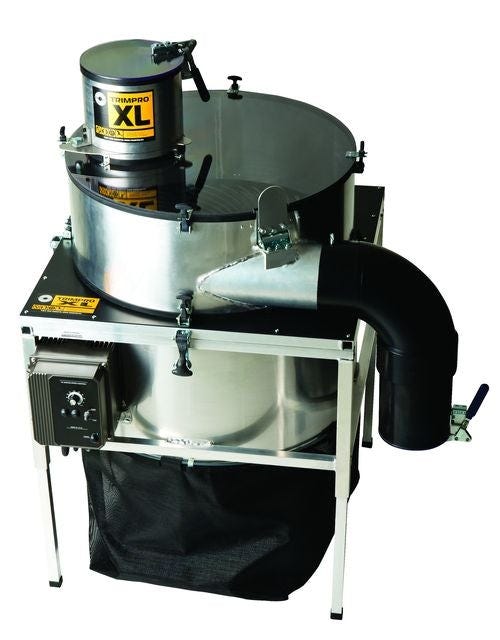
EZTRIM Trimming Machine VS Trimpro Automatik XL
Whether growing one plant or a roomful — nothing is more exciting than harvest day.
Regardless of how amazing your plants crop is, everything depends on the next step: trimming. From overall bag appeal to flavor and everything in between — trimming is the deciding factor between mediocre and top-shelf plants.
Although it may feel daunting at first, we’re here to guide you every step of the way to ensure the best trim job possible by using the best trimmer. As you read below, you’ll discover everything you need to know about trimming plants.
What is The Trimming Process
First, let’s talk about why we trim or manicure our plants flowers.
Trimming is the act of removing excess leaf matter from the plants flower. Flowers and leaves on plants are two separate things.
Plants exhibit two leaf types:
Fan leaves (primary leaves)
Sugar leaves (secondary leaves)
Plants cultivators discard the large fan leaves. However, the “sugar leaves” are trimmed and saved because they exhibit trichome coverage due to their proximity to the buds. In either case, the overarching goal is to remove as much leaf matter as possible.
Remember, you want to smoke plants buds — not leaves!
Therefore, you must learn how to manicure the plants flowers to perfection by using specially crafted trimming scissors or trimming machines.
Features:
The Ez Trimmer removes unwanted leaves from your flower and is the only solution that can deliver trim quality which surpasses manual methods. The key to the Ez Trimmer’s superiority is that it allows the user to adjust multiple variables in the way you trim in order to adjust for wet and dry product, as well as different strains, sizes, and growing methods. The EZ Trim Machine comes with both a dry trimming grate as well as a wet trimming grate, giving you the ultimate control of how to process your flower. The Ez Trimmer is not only quiet and lightweight, but also features the following unique adjustable controls: Flower Movement through Airflow and Suction.
Features:
To respond to the needs of larger producers, the TRIMPRO trimmer has a capacity and productivity ratio 5 times greater than its baby brother, the Trimpro Automatik. The TrimPro XL trimmer’s fluted design of the grate facilitates the plants movement. When combined with the dimmer on the motor regulating the whirlwind velocity plus the height adjustable six (6) blade assembly, the operator is always in full and precise control of the XL and the finished product.
Why Bother Trimming the Buds?
If you ask people from the plants community, they are probably in unison saying that it is necessary to trim the buds. It does not matter how you do it. The important thing is that they are trimmed.
Enhanced THC: Your buds have sugar leaves. The latter are low in THC and can negatively affect the overall quality of the plants. With trimmed buds, there will be better THC gram-on-gram, improving the quality of the plants.
Smoother Experience: When your plant has leaves, it will be harsher when it is smoked. This can make you feel uncomfortable as it will irritate the throat. According to High Times, leaves contain chlorophyll. When they are not removed, it can be harsh.
Improved Appearance: Aesthetics is another reason why you need to trim the buds. If you look at photos of plants online, they seem perfect, too good to be true. You can achieve the same look if you use a bud trimmer. This is going to make plants more attractive!
Which Trimming Method is Best?
Any plants grower would agree with me when I say that trimming plants is an art and a science. You need to do it with care for the best outcomes. With this, one of the things that need to be decided upon would be your choice of trimming.
Wet Trimming: This is the more common method and also the one that is easier. When plant is trimmed while it is wet, it can result in a more manicured look. The buds will look prettier, which is exactly why this is what most people prefer.
Dry Trimming: Under this method, the plant is allowed to dry first. The larger fan leaves also have to be manually removed. This does not only take more time, but also more effort on your end.
What are the Types of Bud Trimmers?
Before we discuss the best examples of bud trimmer machines, they can be categorized into two:
Manual Trimmers: These are the ones that are operated by hand, which means that it will require quite an effort. They are usually the cheaper option. Most of the products mentioned below fall under this category.
Automatic Trimmers: It comes with an electronic motor that automates the process of trimming. This is less time-consuming and easier to operate, which is perfect if you are trimming a large batch of plants.
The Right Way to Trim Buds
More than having the right trimmer, here are other important tips that you have to keep in mind:
When you trim, remove everything not covered by trichomes. This include foliage and red pistils. They do not have any content that will affect the overall quality of the plants.
After trimming, make sure that the plants is stored in an airtight container. Store it away from heat. Keep it in a cool and dry place.
Always clean your trimming equipment after use, which will help prolong its functional life.
Wear gloves. Resin in plants can be difficult to get off your hands after if you do not have gloves.
Conclusion
Machine trimming can be a great option for a number of reasons. Perhaps you have a couple grow tents and can’t handle all the trimming yourself, or you’re scaling up production in a big grow to accommodate larger harvests. No matter the reason, there’s lots of different options that are available to you, and you’ll have to decide which product is most suited for your needs. I hope this article can help you to choose the satisfying bud trimmer.
Best Bud Trimmer Machines 2022
The best bud trimming machine is an essential, useful tool that allows plant producers to do their task of trimming bud without having to worry about making a mess or getting trouble with sticky resin; reduce a lot of effort and the timer it takes to gather trimmed pieces, and swiftly and easily eliminates primary fan unsightly leaves from your buds. All of these benefits are contained in just a trimming machine.
Are you fed up with the tedious task of manual bud trimming? We’ve compiled a list of the best bud trimming machines that range from personal use to larger-scale commercial production.
What Does Trimmer Mean?
In plant cultivation, the trimmer is the person or tool that trims the plants to maximize the THC-producing parts of the plants. The trimming is done right before and during the drying stage of the plants.
Although most trimming is done by hand with a pair of scissors, there are commercial trimmers available for larger-scale growers.
When plants are ready to be harvested, which is usually after white hairs on the buds begin to turn red, they first get trimmed in order to remove extra branches from the plant. The whole plant is then hung upside down in order to cure in a cool, dark space for about a week.
When the plant begins to dry, whatever leaves remain will wrap themselves around the bud. The trimmer’s job is to cut these leaves away with a small pair of scissors. The idea is to expose the flowering top that is covered in the buds and crystals, which are the desirable parts of the plant.
Different varieties of plants are trimmed in different ways, depending on the structure of the plant. Some strains, like Afgooey, is leafy, but the leaves are heavily covered in crystals, so extra care must be used when trimming.
If the intended market for plant is seeking the plants for medicinal purposes, the trimming needs to be adapted in order to keep some of the larger leaves. If the plant strain is intended for recreational use, the trimmer aims to expose as many buds as possible.
ECO Farm 3 Speed 18 Inch Automatic Bud Leaf Trimmer Machine

Features:
The ECO Farm trimmer is equipped with a maintenance-free motor and sharp stainless steel (3) blades. This flower bud trimmer can automatically output after completion; it is equipped with a clean and environmentally friendly handbag; it does not leave garbage. Prune excess leaves and stems quickly, effectively and preciously. Easy to fold design, easy to transport or store. High-speed blades and fan trimmers rotate, raise hair and finally discharge the trimmed plants. The emptying port can be opened when the machine is running to realize non-stop production.
DL Wholesale 18" Stand Up Leaf Trimmer
Features:
The DL Wholesale 18" Stand Up Trimmer is a great way to increase your harvest efficiency and save you from the frustrating, painfully slow process of trimming by hand. This motorized trimming machine is incredibly cost-effective, much cheaper than any other machine trimmer. An extra sharp blade makes clean cuts, preserving your flower and preventing damage. Built-in fan blows trim down into the collection bag, separating from flower and preserving for extraction. Two different speeds to meet whatever type of trimming needs you have.

Features:
Pro-Cut P2X is an easy to use trimmer that provides you with the benefit of trimming through all of your plants that need trimming. The Pro-Cut P2X leaf trimming machine can trim yields in minutes. With this leaf trimmer separating excess leaves and twigs from a mess of plants and flowers becomes easy. So you don’t have to worry about sorting things here. Alongside, the Pro-Cut P2X garden machine can also trim plants and small bushes like oregano, basil, rosemary, mint, lavender, coriander and parsley. Once the leaves are trimmed, you can then use it for multiple purposes. And the best part: it works quietly which means no more headaches!
Ways of Trimming
As straightforward as this might seem, there are two trimming methods used by plant growers, wet trimming, and dry trimming. Both methods, wet or dry trim, have their pros and cons. At this point, plant experts can’t seem to agree on wet trim vs dry trim, and which is better.
BENEFITS OF WET TRIMMING
In general, plant industry experts find that wet trimming is the more efficient trimming method. Here are some of the pros of trimming wet.
Wet trimming is easier. It is easier to remove the fan and sugar leaves while they are wet. When those leaves are left to dry, they shrivel up.
Easier trimming means it takes less time to trim.
plant buds dry faster without all the leaves attached, as the leaves retain moisture.
Because of the faster drying, there is less chance for mold to form between the stalk and the flower. This is more of a concern in humid climates. Remember that mold ruins the harvest and makes it unviable.
Wet trimming takes up less space, as you remove all the foliage off the buds before drying instead of hanging up the entire plants to dry.
Wet trimming allows the buds to puff up, making them more visibly attractive. For growers selling flower, this is important, as consumers often buy based on how the buds look.
Some growers have pointed out that wet trimming allows the trichomes to stay intact thanks to the stickiness of the plant. This can preserve the terpenes (flavor) of the final product.
DISADVANTAGES OF WET TRIMMING
Trimming wet also has some notable downsides. It’s best to take them into consideration before deciding between wet trim vs dry trim.
Wet trimming can reduce the quality of the product. The sugar and fan leaves protect the buds while they dry and can help to create an ideal moisture level. When they are removed before drying, it can cause the buds to dry up more quickly than they should and negatively impact quality.
Shorter drying time means retention of chlorophyll. More chlorophyll adds a harsh flavor to plant, making it less smooth for smoking.
The work of trimming must be done immediately after harvest, all at once. This can be stressful due to all the time and energy it takes in a short period of time.
Wet trimming is messy. The plants are still sticky, so they get stuck to everything: your fingers, your trimming shears, your clothes, etc. Sticky trimming shears have to be cleaned up often during the process. Using gloves is usually necessary. Coconut oil or rubbing alcohol can help with the clean-up.
BENEFITS OF DRY TRIMMING
The dry trimming process also has a lot of advantages, which is why there isn’t an easy answer to the dry trim vs wet trim debate. While it is generally thought to be less efficient than wet trimming, many view it to be more effective. Here are the benefits of dry trimming.
Dry trimming allows plant growers more control over the drying speed, as the exterior foliage retains moisture. This ensures the buds won’t dry too quickly.
Dry trimming typically means better quality plant in the end, as retaining the moisture while drying allows the buds to dry at the correct speed. This can preserve potency and terpenes.
Dry-trimmed plant provides a smoother, more pleasant smoke. The longer the buds take to dry, the more chlorophyll they lose, and less chlorophyll means better flavor.
You can take your time when you go the route of dry trimming, making for a less stressful trimming experience.
It is less messy to dry trim, as the buds are less sticky. This reduces the level to which the buds attach to everything they touch.
DISADVANTAGES OF DRY TRIMMING
Dry trimming comes with some cons that are worth considering as well.
It is noticeably more difficult to trim dry plants. This is because the dry sugar and fan leaves curl up and attach to the bud. Thus, they become more difficult to cut off. This is especially true of the sugar leaves, which may end up nearly impossible to remove.
More difficulty means dry trimming is a more time-consuming process. It takes many additional hours to get through the same amount of trimming when going the dry-trim route.
Dry trimming comes with a higher risk of mold, particularly in humid climates. In some cases, dry trimming may not be possible if the climate is too humid.
You need a lot of space to dry trim, as you hang large chunks of the plant, leaves included, to dry before you trim. Some growers do not have room for this.
Should You Wet Trim or Dry Trim Plants?
As with most things in the commercial plant industry, the decision on which trimming style works best for you comes down to preference. For example, you can use high-output, wet-dry mechanical trimmers for freshly harvested plant. And you can hand-trim plant that has already been dried. With so many hybrid methods of trimming plant available, there are solutions available for every cultivation business model.
Regardless of how you roll, we have the tools and supplies you need to trim plants, wet or dry. And don’t forget, there are a lot of additional supplies that come in handy. Face masks to reduce contamination, eye protection from UV lights, gloves — and if you don’t see what you need, reach out to our team of experts. We’ll help you source everything needed to start or upgrade your trimming capabilities.
ECO Farm T5 Fluorecent Fixtures VS DuroLux T5 Fluorescent Grow Light Fixture
A few years ago, growers usually only used fluorescent tube lighting as a supplemental light for plants, or for young seedlings and clones only.
In recent years, we’ve seen the creation of new high-light-output versions of fluorescent grow lights which can actually be used through the entire vegetative stage.
Some growers even use fluorescent grow lights such as the T5 successfully to flower their plants (if the plants are kept short/small enough through growth control methods).
In general, I recommend changing to stronger grow lights like LEDs or HIDs for the flowering stage because they will usually give you double or more yields/watt of electricity. Unless you keep your plants very small, they will need more light to produce buds than a fluorescent light can usually produce. If you’re in a dire situation where your plants have grown too big and you can’t afford to get a different type of light, you can supplement your fluorescent tubes with additional light, for example, you could supplement their light with a few CFL(compact fluorescent light) bulbs wherever you notice any “shadowy” areas. This is only a minor fix — the real fix is to grow very short plants or upgrade to a bigger light for the flowering stage.
How Efficient Are T5 Grow Lights?
Since T5 grow systems are optimized for flexibility, they can be used in all phases of a plant’s life cycle.
If you’re one of the few that enjoys growing plants by seed, then you know that young sprouts need enough light to avoid stretching.
T5’s allow for you to dim the bulbs and reduce the power output by 50–75%. This amount of light is perfect for keeping sprouts short and without inducing any additional stress.
During the vegetative phase, you can increase your power output to make sure your plants are receiving the light they crave to fuel their growth.
T5’s are perfect for keeping close enough to the canopy without the worry of inducing heat stress. In stark contrast, HPS and MH need to be at least 6”-12” or more above the canopy to avoid heat stress.
Your T5 can be placed 1”-6” above the canopy, which also enables your plant to grow short nodes. The reason for having little space between nodes is that your plant will stretch less during flowering and bud sites will remain compact.
During the flowering stage, you can boost your power output to 100%. This allows your buds to grow without hindrance, all the while keeping your T5 4”-6” above the canopy.
All of these aspects enhance the quantity of your eventual harvest and keep your grow room efficient. T5’s give us the ability to control so many important factors in growing plants.
ECO Farm T5 Fluorecent Fixtures
Features:
This ECO Farm grow light has a high light output, meaning it would work well at any stage of growth. It emits high lumens and claims to give 30% more light output against other grow light systems. For extra light coverage, this grow light from ECO Farm also comes with a 95% built-in reflector, which is a luminium reflector with white powder coating, so your plants are guaranteed to absorb more light than if no reflector were included. Despite its high-power output, this grow light is one of the more budget-friendly options available on the market.
DuroLux T5 Fluorescent Grow Light Fixture
Features:
The grow light has 20000 Lumen, Which is a professional grow lighting system, and it also has a 95% reactivity German Hammer-tone reactor. 30% more light output vs comparable systems. Qty4 6500K 4ft Lamps, Hanging hooks and chains, 8 FT Power cord. Power up to 5 fixtures o one wall outlet — less clutter, more convenience. 2 switches on the body allow for step dimming — one for inner 2 bulbs, another for outer 2 bulbs. It is rated for operation in Wet/Damp environments.
Important Qualities to Look for When Buying a T5 Grow Light
There’s nothing worse than your T5 grow light malfunctioning during the last two weeks of your bloom cycle. Instances like these can easily make or break your harvest and lead to underwhelming results.
Not only could an outage or spark ruin your grow, but it could also potentially have life-threatening consequences.
How Many Lamps Should Your T5 Grow Light System Have?
Another essential aspect to look for when buying the best T5 grow light is the amount of lamps. T5’s generally come with 2, 4, or 8 bulbs depending on the size of your grow space. This is a critical aspect to know before you buy.
Whether you grow in a room or a grow tent, the number of plants will be the determining factor in this category. In my experience, as long as your plants receive a full 360° coverage, they’ll happily produce ample buds.
To determine how many bulbs you’ll need in your T5 grow system is to know how many plants will be in your grow room.
Other important aspects of assessing beforehand are: how big or small will your plants be during flowering? Will you utilize the Screen of Green technique (ScrOG) or the Sea of Green method (SOG)?
I’ve seen countless grow operations where a single bush required a full 8-lamp T5 grow system all to itself. On the other hand, you could potentially fit 9 small plants clones under the same 8-lamp T5 system.
Advantages Of Using The Best T5 Grow Lights
This must be the question you’ve been waiting for. There are a plethora of benefits when it comes to growing with T5 systems.
These lights are highly flexible to fit the needs of beginners to green-thumb professionals. Let’s take a look at what the best T5 grow lights offer.
Adaptability is the T5 grow lights best trait. Just as species throughout time have adapted to exist in their given environment, so does the T5. No grow room or grow tent is created equal.
Each and every grower has a unique situation that can’t be replicated, and it’s for this reason that T5 manufactures built in some necessary functions.
The most significant advantage is that T5’s can be hung in a wide variety of ways: overhead, vertically, or horizontally.
Their slim profile allows them to be raised even higher when your plants begin to explode in growth during the first few weeks of flowering.
Traditional HPS (high-pressure sodium) and MH (metal halide) lamps are bulky, and this disadvantage forces you to concede at least a foot in vertical space to accommodate their size.
Another crucial advantage is the ability to dim your lamps. High-quality T5 grow systems have built-in power switches that allow for 25, 50, and 100% power output.
This benefit allows you to dim your power output during the earlier phases of growth since plants don’t respond well to high amounts of light during this period.
It’s also a mechanism to save you money when you don’t need to run your lamps at 100%.
Conclusion
Deciding on a brand new T5 grow light for your grow room or grow tent can be tricky if you don’t know where to start. Fluorescent grow lights like these can be used in any growing situation, from propagating clones to growing full yields.
We know your time, energy, and money are valuable, so we’ve compiled a list of the best T5 grow lights of the year. And with this guide, you’ll have the tools you need to give you the results you’re looking for. That way you don’t need to spend hours and hours doing the research and can instead dedicate that time to preparing your grow room.
Whether you’re looking to go big, add supplemental lighting, or you need something around your budget, the T5’s listed here are all awesome options. All you need to do is decide which T5 light is the best for your growing goals.